Monday 26 March 2012

How to clean your wheels because you are too munted to do anything else

So this weekend I decided to do something different and go snowboarding. I'm not very good at snowboarding, having only gone two other times. I managed to do some pretty good runs, and one of the trails we were on was 2.5 miles down. I also managed to do some really epic stacks, the worst of which was a 45-foot fall down a really hard icy bit. I smacked my head and back on the ground a couple of times and gave myself whiplash and a concussion. Yay me. (Note, the concussion wasn't as bad as the derby one, but it was enough that I had a headache and felt like throwing up and couldn't recognise shapes and letters for a few minutes.) Yuck. But what that meant was that I couldn't skate. My back was messed up and I couldn't move my neck, so the idea of swivel head was just impossible. Bleh. But anyway, by now you might be wondering what the title of this entry is about. I give you the:

Sadface pity party slightly-OCD wheel cleaning festival of one


Yeah, seriously. Well, my wheels were pretty grody and the SCRD floor is really dusty. The BAD floor isn't as bad, but they have carpets down and those are dusty too. So either way, it is cleaning time. But I'll write this up as an instructional or something, so yeah.

So, since I can't move around a lot because my neck and back are messed up, I set up a bunch of little stations all around the floor for the different things that I had to clean. Here's like the equivalent of an ingredients list (i.e. the things you'll need to clean your wheels):

Yoga mat optional, but really helpful for sore butt.
  • Skate tool/bearing press/T-tool thingy to get your bearings out of your wheels
  • Bucket with warm (not hot) water
  • (MILD!!) dish soap
  • Some small container (old butter tub)
  • Paper towels
  • Something else to put under the bucket (I used a crap load of shopping bags from Trader Joe's)
  • Old toothbrush and sponge
  • Bearing Wash
  • Wash Bottle
  • Bearing lubricant
  • Towels
  • Plastic bag (like a ziploc bag)
  • Safety pin or needle or push pin

And this is how you do it:

1. Disassemble your parts
The first thing you do is take your wheels off your skates. Duh. Otherwise you can't really clean them. Use your skate tool to take your wheels off, and store the nuts in a plastic bag so you don't lose them (alternatively, you can put them back onto your skate axles). Your wheels still have their bearings in them, and you can see how dirty they are by giving them a spin. If they make a "r-r-rrr-rrr" kind of noise, clean them.

Next, pop your bearings out of your wheels. I just use the little allen key thing on my T-tool to lever the back ones out, and then the end of the T bit to push out the other bearing. Then, you'll have a bunch of wheels, and a bunch of bearings. At this stage, dump the wheels (sans bearings) into the bucket of water with some dish soap. Also, fill the little tub with water and a tiny bit of dish soap as well while you're at it.

Now, the bearings. Use your pin/needle to prise off the rubber cover off the bearings, and drop the covers into the litle tub of water. Don't use solvents on the covers because the rubber has to pretty much seal your bearings in and solvents can wreck the rubber or make it disintergrate or something pretty nasty. Once you have all of those out, you should have sixteen bearings in a pile and sixteen of those little rubber covers. PROTIP: be careful taking the covers off the bearings. I flicked one out with a safety pin and then freaked out because I couldn't find it for like 20 minutes. Ze Boyfriend found it for me and it was on the other side of the room behind the playstation. :P

2. Clean your bearing covers
My bearing covers were so covered in dust that they made the soapy water in the tub a little bit grey. Ew. All I did at this stage was soak them in the soapy water for a bit, and then take them out and gently scrub them with a toothbrush to get the dirt off, and then dip them back in the soapy water again. I did that twice, and then patted them dry with a towel (be careful not to bend the metal bits on the back) and then laid them to dry on a paper towel. You don't have to do it THAT many times, but mine were particularly grody to start with. The toothbrush helped because there's little bits of dirt that get caught in the printing on the covers, and it gets them off without wrecking the rubbery bits.

3. Wash your bearings!
By now you should have 8 wheels in the bucket of water, 16 little bearing covers drying on a paper towel, and a pile of bearings. Dump out the litle tub of soapy water, and keep the tub.

I know there are various ways to wash your bearings, and depending on how you do it different things will apply. For example, you could put your bearings all in a dish and then move them around in the dish. Or you could get a wash bottle and use that. I use the Bones bearing cleaner bottle with spacers like this:

I think the key features of cleaning bearings are agitation and a good bearing wash. So long as the bearing wash goes through your bearings and actually removes the dirt and stuff, it doesn't really matter if you clean your bearings with a fancypants wash bottle or just shake them around in a dish. But make sure that you do agitate them a lot to get the dirt out, and check every now and then for how they sound when they spin. They shouldn't really be making much noise at all. When they are like that, I guess I'd consider them clean. When that happens, put the bearings on some paper towel to dry. (I put them with the open face side down, but I don't think it really matters.)

If you use a wash bottle, you can only wash eight bearings (enough for one skate) at a time, so you'll need to redo this process with more bearing wash. Dump out your old and dirty bearing wash into the tub. Mine was all grody with tiny flecks of crap in it. I don't know how much crap bearing wash can take, but I usually wash each new batch of bearings in the bottle with new wash. I guess otherwise it's kind of unfair that some bearings get clean wash, and some get secondhand wash? I don't know. But yeah, repeat the process with the other eight bearings. DO NOT RINSE THEM WITH WATER. They'll rust, and you'll just have wasted a wash and wrecked your bearings. Boo.

When you're done, you'll have a bunch of bearings drying on paper towel and a bunch of weird chemicals in a tub. Now, I was talking to Steffin about this the other day, and neither of us feel right about dumping old bearing wash down the drain. After all, it does come with all these weird warnings about not to touch it too much or drink it or get it in your eyes or whatever, so it can't be good for sticking in the ocean. But what to do? Well, if you're using a small, disposable container, you can just put the lid on it and seal it, and then throw it in the bin. If your container doesn't have a lid, maybe seal it (cling wrap or duct tape or whatever) will work anyway and then you can safely pitch it. Remember to wash your hands when you're done fiddling with these chemicals.

Leave everything to dry on a paper towel. I did mine overnight, because you want to make sure everything is 100% dry before you reassemble them. Don't be tempted to use a hair dryer or something on the bearings and the seals; the super hot air can sometimes warp the plastic/rubber. But yeah, maybe leaving them in a warm room is okay.


4. Wash your wheels
This bit is just manual labour. I think I T-stopped at some point through some dirt or something, because my wheels were like this and all flecked with crud:


Soaking your wheels will sometimes get some of the crud off. If it's just like dirt/mud flecks, they'll come off on their own. Mine were weird caked on flecks that were stuck in the grooves in my wheels, so I had to scrub them with the scrubby bit on a sponge (but not too hard). If you do this, scrub in the direction that the grooves are in, or else you might wreck the grooves. This probably took the longest time because every single wheel I had looked like this. Also, I had little tiny pebbles embedded in some bits of my wheels (they're really squishy, so yeah) and I had to pick those out with a pin. I did each of them and let them drip dry a bit in that top bit in the bucket where you wring the water out of your mop.

After that, drain the soapy water and rinse your wheels with clean water. I didn't know how polyurethane reacted to soapy water on a long term basis, and it just seemed a good idea to rinse the in water. Then, it was onto another paper towel and then left to dry overnight.

5. Reassemble your wheels
Reassembly is pretty straightforward. Make sure everything is dry. Seriously. 

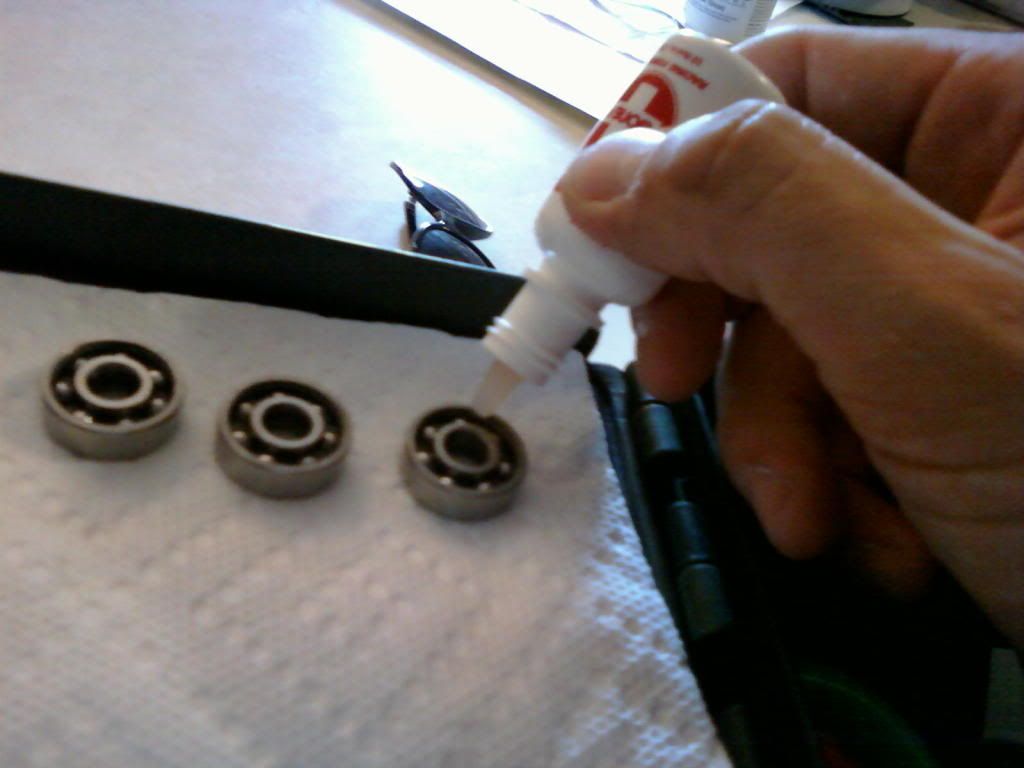
If they are, then do the whole process backwards. But before you start, put some bearing lubricant into your bearings. I like Bones Speed Cream, but you can use sewing machine oil as well, or whatever. Just don't use WD-40 for the love of derby jesus.

I think 1-2 drops suffices for each bearing. Given them a spin after you lubricate them just to get the oil distributed around your bearing evenly. If they're all lubricated, then press the bearing covers back onto the bearings (make sure the rubbery side is on the outside).

Then, press your bearings back into your wheels, and then put your wheels back onto your skates. This is why it's important to keep the nuts safe this whole time for your axles--it would really suck balls if you got to this point and then realised that you've lost an axle nut. Boo. But otherwise, I think that's pretty much it.

For quicker maintenance, occasionally wiping down your wheels and bearing covers with baby wipes is effective.

Also, iced tea looks like dirty bearing wash:


EDIT: FOR THE LOVE OF DERBY JESUS CHECK YOUR BEARINGS AND AXLE NUTS BEFORE YOU SKATE!!  I didn't, and because I'd put bearing lube in and my nuts weren't tightened enough, I was skating along at training and MY FRIGGING WHEEL FELL OFF. Yes. It rolled away and I was on 7 wheels. The bearing also popped out but I put it back in, and then everyone had to spend like 10 minutes looking for the stray nut. Awkward. Also, Pain laughed at me because I freaked out and yelled out "I LOST MY NUT!!" I didn't stack, but you can see how this could be kind of dangerous. :P

Tuesday 20 March 2012

Tonight's offskates training: manual labor!

Yesterday we went to SCRD to scrim and train, and when we got there, the floor looked like this:
 NOOOOO! They were covering up their lovely concrete tile floor with plastic tiles. Mega sadface. SCRD had acquired a plastic tile floor, kind of like the one they use at BAD. I really liked their old floor; it was a bit dusty (and made your wheels grubby) but it was so nice and smooth and flat. Plastic tiles sometimes have a tendency to bubble (like if they don't get snapped down properly) and also cracks, since there's about an inch between them and the concrete floor. To be fair, the concrete floor was pretty hard to fall on and the plastic stuff is a bit more springy and gives a bit, but I'm still a bit bummed that the nice concrete floor was covered up. I would have been much happier if they just sealed it and we could skate on that. Oh well.

I think it's a second hand floor, because they also had to powerwash a bunch of tape off it. So the tiles were wet and slippery. And assembling these bastards is hard! There are little plastic things on two sides (like one on the length and one on the width) that interlock with the loops on the other two sides. That also meant that if you started at the wrong end you would have to put the plastic loops under plastic tiles that were already down, which resulted in squashed fingers and a lot more work. We started at the wrong end. Boo.

I moved like a thousand of these bad boys.
So then we tiled to the right end, and then started from there! We broke/assembled the tiles into 5x5 squares (which were light enough and not ridiculously bulky to move--I could carry a 3x5x5 without too much trouble) and then laid them down so that we could assemble them when they were in place.


Basically, the brown/gold pieces were outside the track, and the blue ones were inside. The one at BAD isn't colour coordinated; it's basically that white/grey marbly looking stuff with random fluroescent yellow or pink tiles, and they just taped off the track with bright pink tape, but the contrast on this one was more obvious:

Shape fail, or that is a really weird apex to jump.
Luckily, the old track tape was still down so we could use them as a guideline. I wanted to get the tiles as accurately as possible, so it would look nice and accurate, so I was doing this sort of thing:

Pretty handiwork, if I say so myself.
D called me out on being "a bit crazy OCD" because I was being a perfectionist. Ha ha ha.

But that meant that I had to reassemble the 5x5 squares, boo. And then the track was much more pixelly than it had to be. It ended up looking like this on one of the corners:


And this is the outside of the track, looking in:


We had to leave at about 9:30pm or so to go home, and I think people were still there until 1am, so I don't think there was any skates on. But this is what it looked like when it was 3/4 done! Nice 8-bit track, if I say so myself.


I'd still prefer the other floor to skate on, but let's see how this one goes on Wednesday.

Friday 16 March 2012

SCRD training, for realz yo!

Sparks uses this as the junior derby logo.
So, I went to a full SCRD training yesterday. Full training is like their league training, and league members have to attend 66% of trainings per month (or 50% if you live over 50 miles away). We live over 50 miles away. Actually, it's a pretty big time sink going to SCRD--yesterday I left home at 5:30pm for a 7pm training, and I was STILL late because the traffic out of the city is mega ridiculous. Argh. At least they have offskates training from 7-8, and then onskates 8-10, so it wasn't like I was super super late. Also, they have junior derby until 7:30, so offskates takes place on the side of the track. When we got there, people were doing stretches and whatnot, but nothing really substantial seemed to have taken place yet. We did a lot of hops and agility stuff (jumping side to side, forwards/backwards etc.) until the jr.derby kids were done, and then we did a bunch of side runs and grapevines up and down the length of the room. It was a good warmup; people were already sweaty after it.

Then it was skates on time. D. Enforcer and Roxxxy took us through warmup stuff, which was a 25 in 5. Apparently up in Mendo they do a 25 in 4, and that's what I really want to work towards. D was timing us (in groups really) and I managed to finish in a bit over 4:30, so that was good. Then Felony Assault took us through some stretching, and then it was pace lines! D made us do pace lines where your hand had to be on the back of the person in front of you, and the person who was weaving through the pace line had to go UNDER your arm. Actually, D said that she was talking to someone about me and said that I was "small and could fit through all kinds of holes", haha. I am goddamn famous.

I didn't have much trouble doing the drill (except I kept being really dumb and going on the outside on corners, WTF?). Okay, but my stumpy arms made it pretty hard for everyone else who had to go under mine, because it's short and an "arm's length" for me is not very much at all. I got headbutted a whole bunch of times, and I hit someone in the face with my arm. Whoops. Also the person behind me grabbed the back of my shirt and almost undid my bra as we were skating. Awks. We did that drill a bunch of times, and then backwards weaving too. The only thing was that my left hip flexor thingy was a bit sore, and my right ankle was angry at me after all the pace lines. At least when we had water breaks, I could stretch it out a bit.

Then we did the boomerang drill again; 2 minutes derby direction, 1 minute break, 2 minutes anti-derby. We did that a whole heap of times, at least for 20 minutes. Then we did shopping carts with the same time limites (2/1/2) but switching with your partner every two laps.

Overall training wasn't too bad, and I really liked the level it was pitched at.  But then Rizzo had us all go offskates at the end and we did more strength and agility work! I really like agility drills. But first we had to flip tires. Like, for reals. I've never seen giant monster truck tires before, but holy crap. They were fat enough to come up to my thigh, and I could EASILY have fit in it, twice. But Rizzo got us to flip them down the length of the room and back, and then the second time you had to jump into the tire hole and then out, then run around the tire, and THEN flip it. ARGH. Seriously. It was kind of hard for me to flip the tire because I'm so short, so I could lift it and then I would have to get under it to push it over, and I couldn't steer it to save my life. I flipped it into the wall, into the person next to me and somehow onto its side so it rolled, hahaha.

It sure goddamn is, hahaha. But the tires were bigger for us.

Then we did a bunch of agility ladder things. I love agility ladders, thanks to offskates VDL training and more agility ladder stuff with BAD. They're so fun. I want to be able to do all the stuff we do with agility ladders offskates but with my skates on (probably on my toe stops; having the wheels down might get caught on the rope bits of the ladder). But yeah, that's something to work towards. Next training is on Monday! Scrimmage!! Yay!

Thursday 15 March 2012

Making the team, from the other side of the planet

I checked my facebook this morning and found out that I've been provisionally drafted onto my league's away team for The Great Southern Slam in Adelaide in June this year. That's the Dishonour Rollers--last time I was provisionally drafted for the Cannery Challenge, and then I went overseas and came back and munted myself. Now I've been provisionally drafted and I'm overseas... well, let's hope that when I get back, history doesn't repeat itself. Gah. I'm going to really have to bring my game to earn this spot, but I'm excited to have the opportunity to be part of something as big as this.

But anyway. As big as what? Well, the GSS is the biggest roller derby tournament in the entire southern hemisphere, and all these leagues descend on Adelaide to bout it out for three whole days. THREE WHOLE DAYS OF DERBY!! Squeeeee! And afterparties and merch and learning a whole bunch of things and watching some of the best skaters in the Antipodes duke it out. I will probably be sitting in suicides the whole time if I can get in there. Anyway, this is the kind of stuff I'll be seeing: this is a video from the final jam of the final in 2011 with Sun State Roller Girls and Victoria RDL:


Holy crapballs. I'm kind of scared; everyone else who is going has infinitely more bouting experience than I do. But hey, learning curve and all that yeah? I'm certainly learning a whole bunch of stuff while I'm over here, and I'm excited to take it back home. (Also, this is the best reason to upgrade to new skates, yes? Antiks? Yes?)

Wednesday 14 March 2012

Making the team, SCRD style

This week has been good for skating. I had BAD training on Sunday, then on Monday ze boyfriend and I went down to that Skate Area at Golden Gate Park (that I mentioned here--and the same old guy dancing around with the boombox was there). We brought beer cans and used them as cones to do weaving stuff and jumps. And yesterday SCRD had their newbie tryouts (which was part of the reason why we went to the skate area in the first place, to run through the WFTDA minimum skills test and whatnot). Technically I'm visiting/transferring and don't need to do the tryouts, but hey, it was on at regular training time and half of the normal SCRD team were there as well, plus a photographer and a couple of other new faces.

One of the weirdest things was that there was a girl there wearing a full body lycra bodysuit thing. And skates. Well, she didn't have the head bit zipped up, but yeah, it was something like this:


And then she also had her underwear on the outside. WTF? I was curious and wanted to ask, but I didn't. Oh well.


So, the test consisted of:
  • 25 in 5 warmup
  • Stops (T, Plow)
  • Falls (1 point, 2 point, baseballs, 180* 1 points, 4 points)
  • 5 in 1 (twice, with a 1-2 min break in between)
  • 1-minute planks
  • Cutting (going from inside line to outside and back)
  • Balancing on one leg on the straightaways (with each leg)
  • Another 25 in 5 (which I did in about 4:40, yay)
  • The boomerang drill (two skaters skate next to each other on inside line, the insidemost one pushes the other one out to the outside line, and then calls for them to come back in to the inside line. The returning skater comes in behind the other skater and then pushes them out, etc. I totally fucked this one up because I came back in in front of the other skater, and then swore a lot and laughed probably too much for the assessors' liking.)
No jumps, hops, hits, pushes, pace lines with weaving, or whips. A bit sadface, but that's understandable since it's the newbie tyrouts I guess. I guess things like swivel head, posture, crossovers, obstacle avoidance etc. become apparent when you do enough laps with enough people on the track.

But yeah, I qualify. Yay me. And that means tonight there's grownup league training to go to too. I will be onskates four nights this week, and that makes me happy. And because I don't really have photos for this entry, here, have a picture of some baby otters.


Tuesday 6 March 2012

Drills with whips (oh my!)

I like whips, I like Indiana Jones and
I like Lego. Everyone wins!!

I really like whips. They're fun, and when they're done right they are so super effective. We did some whip drills the other night--well, except for me, because of my stupid shoulder, but I did learn a lot about whip theory.

(Note that this is about drills with forward arm whips. Backwards whips and leg whips are cool too, but I don't know how much of this translates into backwards or leg whipping, although I guess with backwards whipping your left arm is more important since that would be the arm closest to the outside.)

Firstly, the basics on giving a whip. To properly give a whip, you really have to use as much force/momentum (bleh, I'm not a physicist) as possible. This means that you have your arm back, not sticking out perpendicular to you, and then you really fling them. Try not to dislocate your shoulder doing this one. Also, it really helps to stay low with this, because the force transfer will sometimes knock you on your ass if you're standing tall. (In another story, that's how I fell backwards onto my head and got my concussion...)

Whipping also is most likely going to happen with your outside arm. Why? Well, when you whip with your outside (right) arm, it makes an arc which very conveniently follows the direction of the track. Whipping with your inside (left) arm would usually propel your whippee(??) towards the outside of the track, which isn't usually where you want them to go. However, you can do short inside arm whips coming out of the turn or on the straightaways for quick bursts of speed.

There are two types of whip, according to Mindi: there's the "outside arm whip" and then "across your body" whip. I'm not sure if they have more technical names. The usual kind of whip is the outside arm whip, where you have someone grabbing your outside arm and you fling them forwards. When you whip, try to do a low-to-high movement, like if you were bowling or something like that. Since you can either whip in a straight line (down a straightaway) or in an arc (for the turns), this is handy for getting around other blockers.

The "across your body" whip seems to be where you whip someone from one side of your body to the other. I'm not exactly sure how this works, but Mindi described it kind of like throwing a frisbee. It sounds like you take your right arm and cross it over your body and then whip outwards. I'm not sure 1) how that's (directionally) different from a left/inside arm normal whip and 2) how you do that without spinning around and falling over. Again, here, the low-to-high whip direction thingy helps. Otherwise, you're throwing your whippee pretty much to the outside track and into the ground. Bleh. This is a good one for giving a burst of speed.

Another thing to remember once you've given a whip is to hustle! You'll have expended all your energy in giving the whip, so you'll have to catch back up to the rest of the pack, if you want to do anything else (e.g. help your teammates block or whatever).


And then try not to die.
Receiving a whip also has a technique. I'm not a huge fan of hand holding during whips, partially because people tend to have sweaty, clammy hands, and also because hand holding can lead to whip release at weird/inordinate times if your fingers get stuck together (or the velcro on your wrist guards...). Instead, grab your whipper's wrist with both arms (to help with stability) and then let her do the work propelling you. Note that I said wrist, and not elbows or upper arms or something. Trying to whip someone who is grabbing your elbow takes 100% of the effort with only 50% of the results or something. It's like in physics: the longer the distance between the weight and the base is (think like a long pendulum or a flail or something), the more force you can get.

Also, remember to skate out of the whip. There's no point in your whipper expending all her energy if you're just going to coast once you get whipped. The whole point is for you to gain additional speed, so don't waste it just by relying on that. Of course, if you need to coast a few feet while you keep stability then that's okay.

One way to practice this is the monkey bars drill: ever see a monkey go across monkey bars? They use both their arms and alternate transferring their momentum from one arm to the other. This is pretty similar, although you're getting propelled at each "bar". Basically, you start with a weaving pace line but the person going through does so by receiving whips from the other members of the pace line. You have to keep the pace line going pretty quickly to do this drill, and space people out a bit more than normal (so they don't get thrown into the person in front of them) but it is pretty effective when it is done. Well, at the very least, it looks mega fun. Curse my stupid wrecked shoulder, argh!

Monday 5 March 2012

The "Jammer Up" Drill

I like this one a lot. I'm pretty sure this is not what it is officially called, but people said this a lot during the drill, so here it is.

Basically, you start with three lines of people. It doesn't matter how you designate it, but make one line (usually the middle one) your line of jammers, and the other two (the inside and outside ones) are your blockers. They should be in pace lines as follows (behold my mad MS Paint Skillz!):

WTF, I have no idea why there's that checkerboard effect. Ignore it.

When you start your drill, have your first two blockers skate out and ahead of the pace lines. Maybe like 10-20 feet will suffice. Then, you have your jammer up: the first jammer has to get past them, while the two blockers have to stop the jammer. The rest of the pack hangs back, still in their pace lines. The jammer has 10-15 seconds to get past the two blockers. (Or, if the blockers are doing well, they hold the jammer for 10-15 seconds and then release).

Once that time has passed or the jammer has gotten past, all three skate around to the end of the pace lines, remembering to rotate so everyone has a turn being the jammer:


This is good for practicing when the jammer has to get through a pack quickly, e.g. if the pack has big gaps in it and only a handful of blockers are in the way. Also, it's good for practicing 2-on-1 positioning. If you're blocking, you really have to communicate with your partner since you both have to cover the entire track.

VARIATION: Jammer + offense: have your two blockers as before, and then have your jammer up as before, but right after they go up, have a second skater come up as offense, to assist the jammer in getting through the blockers. The offense has to skate up between the blockers and basically make a space for the jammer to get past (or through, depending on how you do it).


Again, when the jammer gets through or 15 seconds is up, skate to the end of the pace lines and rotate.

VARIATION II: Have only the people in the jam on the track. Set up cones at the jammer and pivot lines (but in the middle of the track) to mark where skaters line up to do the drill. Rotate to the next cone when you've had your turn.